
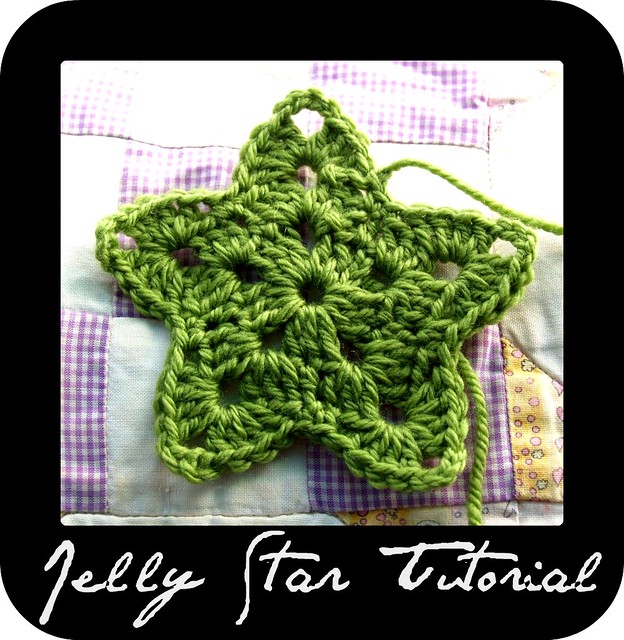
With Xmas only just over a month away I've been getting quite a few emails from people about the Crochet Xmas Star Tutorial I did back here. For some reason Google swallowed up all the pictures from that post back at the start of this year and with the help of a tech-y friend I have finally been able to recover them again....
If you'd like to make some Xmas-y Stars this year then grab yourself some 8ply yarn (1 used 100% merino in the pictures below but cotton would be equally as good) and a 4mm hook.
(note - american crochet terms are used for this pattern)
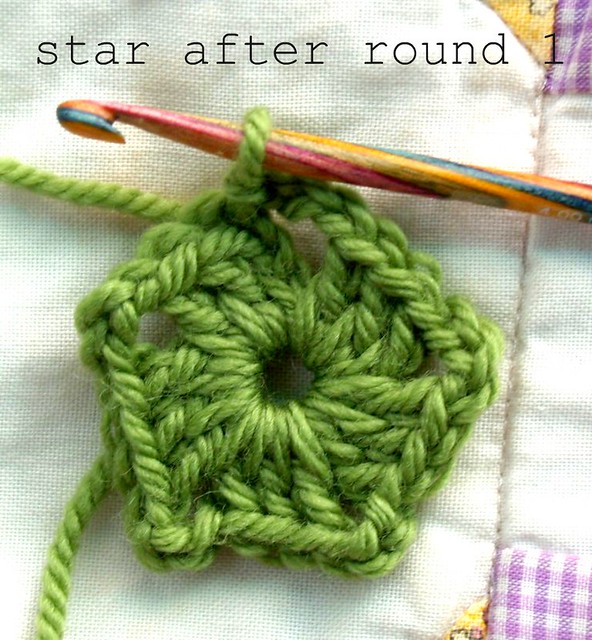
To start, make a foundation chain of 5, join with a slip stitch to the first chain to form a ring.
Round 1 - (you will be working this round into the ring formed with the foundation chain) ch3, 2dc, ch3, *3dc, ch3. Repeat from the * 3 more times (5 dc clusters and 5 ch3's total). Join with a slip stitch to the 3rd ch of the starting ch3.
Round 2 - slip stitch into the next 2 dc and into the first ch3 space. ch3, (2dc, ch3, 3dc) all in the same (1st) ch3 space. 1hdc in 2nd dc of next dc cluster (a cluster is a group of 3dc's worked in the previous round). *3dc, ch3, 3dc in next ch3 space, 1hdc in 2nd dc of next dc cluster. Repeat from * 3 more times.
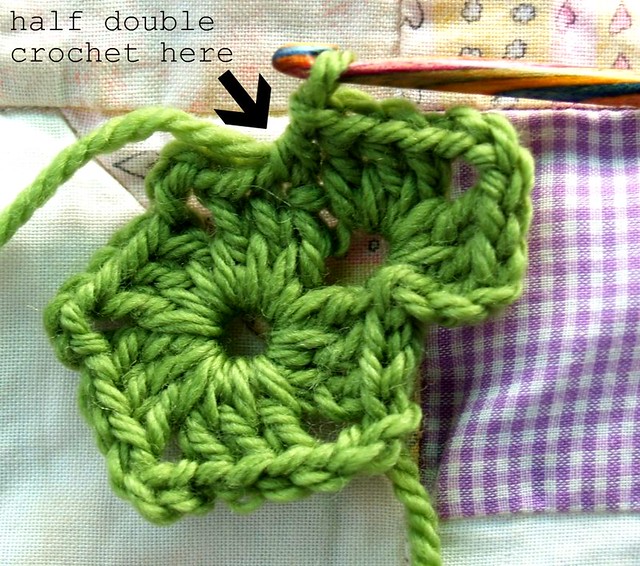
Join with a slip stitch in 3rd chain of starting ch3.
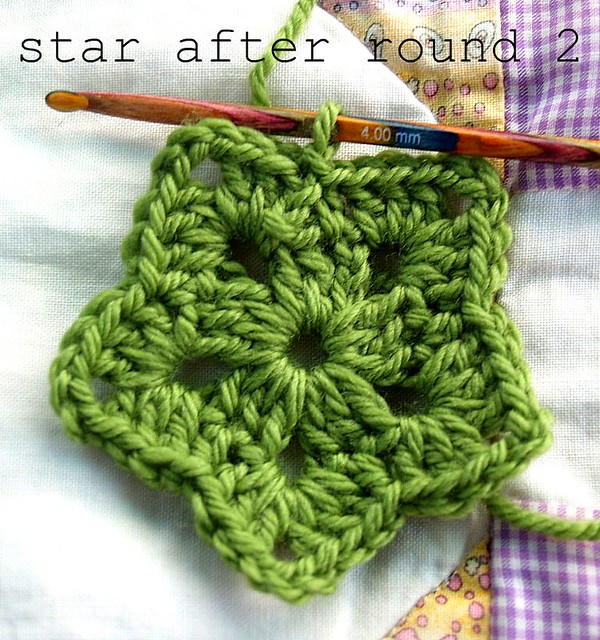
Round 3 - Slip stitch into next 2 dc and into first ch3 space. Ch3, (3dc, ch4, 4dc) all in the same (1st) ch3 space. 1sc on either side of hdc from previous round.
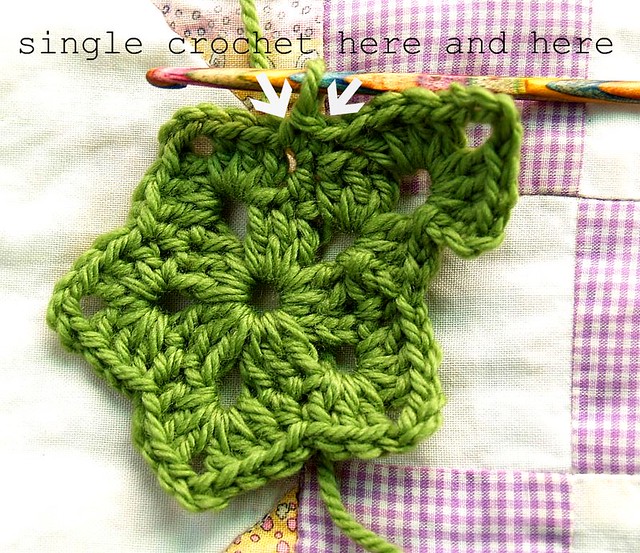
(4dc, ch4, 4dc) in next ch3 space, 1sc on either side of next hdc from previous round. Repeat from * 3 more times. Join with a slip stitch in 3rd chain from starting ch3. Fasten off and weave in ends...

These stars are great sewn into a garland or hung by themselves on your tree. Why not make them in a thick cotton for a Xmas-y themed washer...


Love these Jodie...you make it look so easy! x
ReplyDeleteOh yay! I have been looking for a pattern just like this for some gifts this year. Thank you Jodie. I had better get cracking on those school reports so I have time to get hooking before Christmas!
ReplyDeleteThank you for posting this again. I have been looking for an easy to understand pattern for a star.
ReplyDeleteHope your girls are enjoying the build up to the big day. ( mind you just thought that could be baby or Christmas)
Best wishes from the UK.
These are great Jodie. I always add them to my Christmas gift tags for a little bit of fun. I've made so many I don't need the pattern anymore.
ReplyDeleteThanks
tracy
What a great idea. I am making them for a memorial wreath I am making with red stripes and blue stars, but I like these so much I will be using them in other ways too. Gift tags: great idea.
DeleteThese are just so adorable...thank you so much for sharing them again!!!
ReplyDeleteYAY!!!!!!! thank you sooooo much for sorting this out. can't wait to make some more up. :)
ReplyDeletexxx
Thanks.
ReplyDeleteLovely...besos.
That is a darling star ornament. I did see last time you posted it and so glad you are sharing it again with us. Your garden produce looks so healthy and yummy! Hope all is well, when is baby due????
ReplyDelete(((HUGS))) Susanne :)
Hey Jodie, that's really funny, I've been crocheting stars for our brand new shop in Coolamon. Our patterns are quite similar! I'm only a beginner at crochet, I find it impossible to read most of the patterns but I can work out my own designs much more easily. I wish I had found your great post with action photos, so much easier to follow.
ReplyDeleteHey thanks for the update Jodie. I found your pattern floating around pinterest and love it. I'm a newbie crocheter and was able to follow your pattern without the pics (pinterest link is to the original page). But with the pics is so much nicer! Now I'm off to update my pinterest pin with this page. See you again. xx Fi
ReplyDeleteSo xmas-sy!
ReplyDeleteOh thank you for posting this tutorial..these are so cute and will be perfect for a gift I am putting together for a friend.
ReplyDeleteThe lovely Fiona of Brave New Vintage pointed me in their direction :)
x
Made six of those stars so far, now I know the pattern by heart! They're so lovely and nice to make. Thanks Jodie! Looking forward to the next one...
ReplyDeleteHi Jodie
ReplyDeletethanks again for this pattern. I have linked back to you today on my blog as I have been asked quite a few times for the pattern! http://www.bravenewvintage.com/2012/12/oh-my-stars.html
blessings, Fi xxx
Of all the stars I have tried to make, I love this one the most. Thank you!
ReplyDeleteI should also have mentioned in my comment that I think quite a few people have had problems with their pictures on blogger. Reducing their image sizes has helped them because they had filled their free quota on photobucket.
ReplyDeleteThank you so much for the pattern and pictures for these delightful stars! I've just taken 15 minutes to make my first one - your instructions and pics were perfect. I'm making a least 4 more for our yearly tree ornaments. Thank You!
ReplyDeleteHi! I really liked your star!!
ReplyDeleteI've used it to make a wand for my little girl.
I linked to your site here
http://ahomemakersjourney.blogspot.com/2013/03/crochet-star-wand-tutorial.html
I love this star pattern!! I am still new to crocheting and this is the only pattern I have been able to follow so far, one question though... is there a way to make it bigger?
ReplyDeleteI too was wondering how to make the star larger...like dishcloth size...about 7 - 8 inches wide?
ReplyDeletethanks for sharing your lovely pattern..
blessings to you and yours..
Think this could make a cute afghan or if nothing else a pillow. Thanks For sharing
ReplyDeleteHi Jodi! I would like to ask your permission to use this pattern for a Cambodian project. Could you please email me at tiffanyapril@comcast.net for details. I can't seem to get the email working on your profile. Blessings!
ReplyDeleteJust found your pattern whilst searching google, absolutly love this star, it works up really well, your pattern is easy to follow, going to make lots using different colours for each round, thanks for sharing Jules : )
ReplyDeleteHi Jodi, I just love these little stars. I was wondering if you could give me permission to sell the made stars at boutique's and online. Please email me at am-leigh@hotmail.com. Thanks so much- Amy
ReplyDeleteIt's this time of the year ... Would it be okay for me to translate your pattern into German and reblog it? Of course I would link to your blog. Thanks a lot and happy thanksgiving to you and yours!
ReplyDeleteThank you for this great lesson! It is great!!!! yeeeeeees!!!! thanks!!!!
ReplyDeleteI would like to ask if you leave me I link your tutorial on my blog? is fantàctic, thank you!
kisses from Catalonia!
Hello! Thank you again! If you want you can see on my blog that I did!
ReplyDeleteLink your tutorial on my blog! thank you! thank you! thank you!
http://www.myworldofwool.com/2013/12/crochet-star-for-christmas-decorations.html
Love this star! Very easy to make.
ReplyDeleteThanks! I love this star~
ReplyDeleteLovely star, thank you for the easy tutorial.I would like to pin it but where is the PinIt button?
ReplyDeleteCongratulations!
ReplyDeleteIt's cleat and simple, very easy to make.
And the result is great
This was so quick and easy to make thanks to your clear instructions. I will be making a few of these in cotton to hang on our tree this year.
ReplyDeleteFirst, Thank you so much for this easy to follow adorable pattern!! :)
ReplyDeleteSecond, for those interested you can start this with a magic circle.
I tried it and it went perfect!!
I make it too. Easy to do.
ReplyDeleteThank you, talented & anonymous friend! Even though I'm finding your pattern 6+ years later and have not quite learned to crochet yet, this project looks like it will be both a "keeper" and a year-'round favorite. ~ Fondly, Theresa Ann
Delete
ReplyDeleteWho can worried u,and who can love u so much,who can support u,and who can encourage u in all worries,who can live for u,she is one and only the best mother and the best women in the world....happy womens day...from..
Womens Day Quotes 2016
Womens Day Images 2016
International womens day
womens day wishes 2016
Womens Day date 2016
womens day picture messages
womens day events 2016
kerala psc notifications
Thank you for the pattern.
ReplyDeleteGreat pattern!! Thank you for sharing. I haven't used the scrubby yarn yet but think this might be good size for a scrubby. In the meantime am using it to make a red, white, and blue bunting for the 4th of July.
ReplyDeleteLoved making the star. Will be making more! Thanks for sharing it. Sue from England
ReplyDeleteJust want to thank you for sharing this lovely easy star pattern. It's exactly what I had in mind when I wanted to make stars. I made mine starting with a magic ring, looks good. I did the star in white, so I crocheted a white bead into the 2nd ch of the point (hope you know what I mean) Thank you again :)
ReplyDeleteBest Wishes, Ann from Cape Town
my goodness, all my life I want to make something pretty like that, I hope I can make it as pretty as yours..
ReplyDeleteThis is a great pattern. You made it so easy to follow and they turn out beautifully. Thanks so much for sharing.
ReplyDeleteThis comment has been removed by the author.
ReplyDeleteStandard Star Package this link name a star Certificate without Wooden Plaque Star Foundation Signature Medallion Map of the Constellations,you could actually name a star. The are millions of catalogued stars out there, Several years before if somebody would have told you it is possible to Name a star, you would have mocked it saying it is not possible.
ReplyDeleteIn this case, your job may be on the line, something simple and easy may be the best option. If you are required to take the test by your employer, you will almost certainly be supervised through the process. You can wash your hair, color it, and apply styling products without altering the test's accuracy. The collector will cut between 100 and 120 hair strands off the crown of your head after verifying your identity. To avoid generating a bald area, they can collect hairs from several locations on your crown. If you have little or no hair on your head, the collector may do the test using body hair instead. The hair will be wrapped in foil and placed in a safe envelope before being dispatched for overnight testing. Within 24 hours of hair removal, a negative result might be verified. As a screening test, an ELISA test is employed. This test reveals whether the hair sample is drug-free. If you receive a negative result, it means you haven't used illegal drugs in the last 90 days. So, give it a try whenever you have an upcoming drug test. Continuously drinking fluids alone can be tedious, so we recommend detox pills — specifically,Toxin Rid 5-day Detox Program. It is one of the most popular and effective products that are 100% natural and free of any harmful ingredients. When it comes to synthetic urine, the brand claims it has been derived from natural human urine. Moreover, the company proudly claims its fake pee has never failed a drug test.
ReplyDeletebitlis
ReplyDeletesakarya
van
tunceli
ankara
AGH
whatsapp goruntulu show
ReplyDeleteshow
QCCAEZ
ankara parça eşya taşıma
ReplyDeletetakipçi satın al
antalya rent a car
antalya rent a car
ankara parça eşya taşıma
UMN3Q8
maraş evden eve nakliyat
ReplyDeletemalatya evden eve nakliyat
ağrı evden eve nakliyat
elazığ evden eve nakliyat
aydın evden eve nakliyat
D24KV
https://istanbulolala.biz/
ReplyDeletePKS1Y
yalova evden eve nakliyat
ReplyDeletetunceli evden eve nakliyat
giresun evden eve nakliyat
ağrı evden eve nakliyat
van evden eve nakliyat
M5O26S
2AE84
ReplyDeleteHatay Parça Eşya Taşıma
Ünye Petek Temizleme
Niğde Lojistik
Düzce Şehirler Arası Nakliyat
Adana Şehir İçi Nakliyat
Gölbaşı Parke Ustası
Kilis Evden Eve Nakliyat
Adıyaman Şehirler Arası Nakliyat
Binance Referans Kodu
7662F
ReplyDeleteErzurum Şehirler Arası Nakliyat
Karaman Şehir İçi Nakliyat
Kilis Şehir İçi Nakliyat
Zonguldak Şehirler Arası Nakliyat
Kilis Evden Eve Nakliyat
Hatay Evden Eve Nakliyat
Ardahan Şehir İçi Nakliyat
Tekirdağ Lojistik
Kırıkkale Evden Eve Nakliyat
4DFEC
ReplyDeleteEtimesgut Boya Ustası
Uşak Lojistik
Silivri Çatı Ustası
Kırıkkale Parça Eşya Taşıma
Ankara Asansör Tamiri
Gölbaşı Boya Ustası
Kırıkkale Şehirler Arası Nakliyat
Iğdır Evden Eve Nakliyat
Maraş Parça Eşya Taşıma
C8884
ReplyDeletebinance komisyon indirimi %20
6F101
ReplyDeletebinance %20 komisyon indirimi
97EE1
ReplyDeleteMexc Borsası Güvenilir mi
Kripto Para Üretme
Coin Kazma
Binance Ne Kadar Komisyon Alıyor
Bitcoin Yatırımı Nasıl Yapılır
Bitcoin Kazma Siteleri
Okex Borsası Güvenilir mi
Mexc Borsası Kimin
Kripto Para Kazma
Explore CapCut's extensive collection of filters and effects to add a professional touch to your videos. https://capcut.blog.fc2.com/blog-entry-1.html
ReplyDelete5C3A6
ReplyDeletesakarya canli goruntulu sohbet siteleri
Sakarya Kadınlarla Görüntülü Sohbet
karabük yabancı görüntülü sohbet siteleri
Bolu En İyi Rastgele Görüntülü Sohbet
rize rastgele sohbet
trabzon sohbet
Aydın Bedava Sohbet
sesli sohbet mobil
kars telefonda kızlarla sohbet
4F7B0
ReplyDeletekaraman ücretsiz sohbet siteleri
mersin parasız görüntülü sohbet
ücretsiz sohbet odaları
Balıkesir Bedava Sohbet
Görüntülü Sohbet Canlı
Aksaray Görüntülü Sohbet Canlı
bedava görüntülü sohbet
izmir kızlarla canlı sohbet
tunceli ücretsiz sohbet siteleri
5A33D
ReplyDeleteSweat Coin Hangi Borsada
Soundcloud Beğeni Hilesi
Coin Para Kazanma
Binance Referans Kodu
Apenft Coin Hangi Borsada
Sohbet
Bitcoin Nasıl Çıkarılır
Twitter Trend Topic Hilesi
Dlive Takipçi Satın Al
16CC1
ReplyDeleteBitcoin Kazanma
Binance Madencilik Nasıl Yapılır
Raca Coin Hangi Borsada
Sui Coin Hangi Borsada
Star Atlas Coin Hangi Borsada
Facebook Grup Üyesi Hilesi
Azero Coin Hangi Borsada
Soundcloud Reposts Hilesi
Kwai Beğeni Hilesi
FFD69
ReplyDeletesanal sunucu
sanal sunucu
dedicated server
ehliyet sınav soruları
güneş enerjisi fiyatları
güneş paneli
iç mimar
vds satın al
fiziksel sunucu
9A0CA
ReplyDeleteBnb Coin Yorum
Ape Coin Yorum
Ltc Coin Yorum
BTC Forum
Rose Coin Yorum
Aave Coin Yorum
Flow Coin Yorum
Stmx Coin Yorum
Tfuel Coin Yorum
FHGFTH
ReplyDeleteصيانة افران الغاز بمكة
ewrfegtergrehygrfhfyh
ReplyDeleteشركة مكافحة حشرات بالاحساء
GHGMJK
ReplyDeleteشركة مكافحة حشرات
Nursing jobs in Germany offer Indian nurses a remarkable pathway to enhance their careers within a well-established healthcare system. With a rising demand for qualified professionals, numerous opportunities are available across hospitals and long-term care facilities. Nurses can earn competitive salaries, typically between €2,500 and €4,000 monthly, depending on their skills and location. To support their transition, structured training programs help nurses adapt to German practices and standards. Proficiency in the German language is crucial for effective communication and quality patient care. Many employers also provide relocation assistance, streamlining the move to Germany. This unique experience not only fosters professional growth but also allows nurses to immerse themselves in a rich cultural environment. Overall, pursuing nursing opportunities in Germany is an attractive choice for Indian nurses seeking personal fulfillment and impactful contributions to healthcare.
ReplyDeletehttps://www.dynamichealthstaff.com/nursing-jobs-in-germany-for-indian-nurses
Great and I have a neat supply: What Home Renovation Expenses Are Tax Deductible luxury home renovations
ReplyDeleteشركة مكافحة الفئران بالدمام emCb4vt0Dz
ReplyDeleteشركة تنظيف شقق بالجبيل 20Ny9Pl5jM
ReplyDeleteشركة مكافحة حشرات بخميس مشيط hQlkMElgUi
ReplyDelete827FF23657
ReplyDeleteinstagram takipçi
64838CCC8C
ReplyDeleteMetin2 Pvp
Ömer Behiç Hangi Romanın Kahramanı
dusmeyen takipçi satın al
Online Oyunlar Pc
Bedava Coin Veren Uygulamalar
En Güvenilir Vpn Android iPhone
twitter takipçi
Berivan Çiçeği Hikayesi
Tokyo Ghoul Konusu
D52B3BE136
ReplyDeleteucuz takipci alma
FDDA4FB8FB
ReplyDeletebayan takipçi
Danone Sürpriz Kodları
Happn Promosyon Kodu
Danone Sürpriz Kodları
Kazandırio Kodları
Raid Promosyon Kodu
Whiteout Survival Hediye Kodu
Yalla Hediye Kodu
Avast Etkinleştirme Kodu
شركة تنظيف بالجبيل QsdVcbDomt
ReplyDeleteI’ve been looking for something like this. Great job!
ReplyDelete7F7172129A
ReplyDeleteucuz gerçek takipçi
tiktok beğeni satın al
twitter takipçi
instagram takipçi
mobil ödeme takipçi
D1E6563E41
ReplyDeletetürk takipçi al
beğeni satın al
ig takipçi
düşmeyen takipçi
aktif takipçi